Authenticity is Everything
Matting and framing autographed photos?
Hi everyone,
So I purchased a double conservation mat with foam-core backing. I've been researching on how to attach the autographed photo to the matting itself but I'm confused as to what should be used to "hinge" the photo, and how to attach it to the backing. I've seen archival tape used, as seen on this video https://www.youtube.com/watch?v=w17F047llgI . I'm also concerned that the tape, if directly applied to the photograph, would damage the photo if removed. If there is anyone who is experienced in framing/matting autographed pictures I would greatly appreciate any advice on this manner.
Regards,
Mike.
Replies to This Discussion
-
Permalink Reply by David Jackson on
-
there is a tape that is acid free and easily removable. Probly the tape you mentioned. I have all my photos matted at a local store and they use it. The way the guy described the method to me of attaching the photo was to use ONE piece of tape almost the full length of the top of the photo. Place it on the top with the photo and sticky part facing up and then lay the mat on top so that its straight. He told me to only put tape on top so that the bottom is free to swing. all mine look very nice and I have seen the tape removed and re-aplied. no damage. thats the way mine are done. maybe others have other ways. I just wanted to offer my help.
-
Permalink Reply by W.W. Dunbar on
-
Hi Mike,
Great question. I've been matting & framing my autographs for years. The easiest way to mount photos to mat board is with "Photo Mounting Corners". They were commonly used to mount photographs in albums years ago. They are triagular in shape, and have a pocket where the corner of your photograph slides into it. The back side of the mounting corner has adhesive on, and will stick to the foam core back board. They come in a variety of sizes, and are generally made out of a clear plastic material. By using these you will not have to worry about glues or adhesives touching your treasured autograph. The ones I use measure about 1/3 of an inch on each side of the triangle. Most arts & crafts stores sell them (Michaels comes to mind), and they are rather inexpensive (just a couple of bucks for a box of 250). If you have an 8'x10' photo, you'd want to have your top mat cut with a smaller opening, for example 7 1/2" x 9 1/2' to conseal the mounting corners.
Good luck!
W.W.
-
Permalink Reply by Mike P on
-
Thank you both for your invaluable information!
Regarding the mounting corners: If the adhesive on the back, how would the corners attach to the double-mat in addition to the foam-core backing? Is there another step in doing so?
-
-
Hey Mike,
The photo corners will not ahere to the top mats, only to the backbard. See the illustration below:
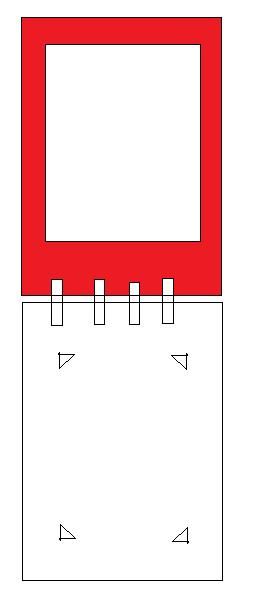
You can hinge the top mat to the backboard with regular scotch tape. Once the 2 sections are hinged you can flop the top mat over the backboard. You can then slide you photo between the top mat & backboard to center it in the opening of the top mat. Next place a paperweight on the photo, and then flop open the top mat. You are now ready to install your photo corners. After you have installed the photo, remove the paperwight, and flop the top mat over the backboard. Check out your allignment, and make sure your photo corners are concealed. Next, flop open the top mat, and lay a few small pieces of double sided tape along the extreme outside edges of the backboard. Finally you will flop the top mat back over the backboard, and with your hands, apply light pressure along the outside edges of the top mat. The top mat will then be adhered to the back board, and your artwork will be ready for protective glass & a picture frame.
-
Permalink Reply by Rick Badwey on
-
Do Not use Foamcore Backing!!!!! Our business, Museum Framing, has performed 100% museum grade framing since 1989 and everything we see with foam backing has over years discolored!
We are even working with an important DC based Museum to go after a local framer who ruined their antique engravings using acid free foamcore.
Acid free and regular foamcore outgasses and causes items to alter in their condition.For backing we use a 2 layer, 4 ply 100% cotton rag and 100% museum grade corrugated which comes in white or blue gray.
And, NEVER use tape. No tape is archival. use either mylar corners, strips or japanese tissue which must be a lighter weight than the document it is adhering too
-
-
Rick you have made some important comments. If you are framing a museum piece, then by all means use should use the finest archival materials to preserve your investment.
I am just an average collector, and have had a lot of fun mounting & framing some of the autographs I've collected over the years. I get many signatures through the mail, and have a lot of 3x5 index cards that I've framed. Typically I will make a double window mat with an 8x10 photo of the celebrity on top, and will display the 3x5 autographed card on the bottom. I custom make my own 3x5 cards (using acid free 110 pound index card stock), and print my photos using the same paper material. I've been using acid free foam core back boards for a long time (15+ years), and have had no issues what so ever. I live in Louisiana, one of the most humid climates in the country, and all of my 3x5 cards are "white as a ghost".
-
-
WW, THANK YOU for that presentation. Really gave a great visual on how it's done!
Rick, thanks for the response, I purchased archival backing (not exactly foamcore) from salinepictureframe.com . They are a conservation-based frame company. All of their products are archival. From my research, acid free is not all it's cracked up to be-it is buffered artificially to a pH of 8. A neutral pH is needed most of the time. This company offers museum quality mats/framing accessories. Where would you purchase the backing you mentioned? Also, how do you hinge the top mat to the backing if you can't use tape (I'm lost on that part)?
-
Permalink Reply by Jon Kellogg on
-
Tape on the mat is fine. I've used the photo corners & I attach them to the cut mat. I might have to trim them if they can be seen.
The cheapest way to frame is make a GOOD copy of the picture & use the cheapest mats & tape.
Cheap the original safe & display the copy worry free.
Here are some "How-To" tips: http://www.framing4yourself.com/tutorial/picture-framing-tutorials/
-
Permalink Reply by E.B.G. on
-
After opening up some of the matted pieces that I've purchased over the years I discovered that many dealers didn't use archival tape. That is really important. My local framer told me that yellowing could occur as little as 5 years after the matting if archival tape isn't used.
-
-
Thanks for your responses Jon and EBG! That site is fantastic Jon, great visuals!
I'm going to list the procedures I've learned from the advice of others/websites given. Please let me know if these are wrong:
You "hinge" the mat-board to the back board through the use of Japanese archival tape. (Is it just one long strip of tape that is placed horizontal in order to hinge mat board to back-board?). Then you put the photograph inside mylar photo corners in which attach to the archival backboard. Next, you place it in the frame?
The part I'm still stumped on is that I have a double-mat-board; which has an outer and an inner mat of different colors. How should I attach the two together? In this video http://www.youtube.com/watch?v=w17F047llgI , before attached to the backboard, the double mat was connected to each-other by "framer's grade double sided tape." Is this appropriate to use if it's archival tape?
If anyone has framed using a double-mat board (an outter and an inner mat in addition to a backboard), any tips regarding this manner would be greatly appreciated. Reading over what I have typed it can sound confusing haha, so I highly recommend that that you all watch the youtube link above to understand what I'm trying to ask.
Thanks for all the help,
Mike.
-
-
Hi Mike,
In regards to hinging, I have always used single sided non-acidic tape.
Every piece that I've ever done has been double matted. I use double sided adhesive tape (Scotch brand - non acidic) to secure the the double mats together.
Once I've mounted the the photo, I'll use a few small pieces of double sided tape (non acidic of course) around the extreme outside edges of the back board. I'll then flop the window-cut double mat into place, and secure the top mats to the backboard. This will keep the assembled piece together, and prevent it from shifting once you install your glass & frame.
By the way I really liked the link Jon Kellogg had in his reply - good stuff!
W.W.
As an eBay Partner Network Affiliate, we earn from qualifying purchases.
Get Our Newsletter
Photos
© 2026 Created by Steve Cyrkin, Admin.
Powered by
![]()
Badges | Report an Issue | Privacy Policy | Terms of Service